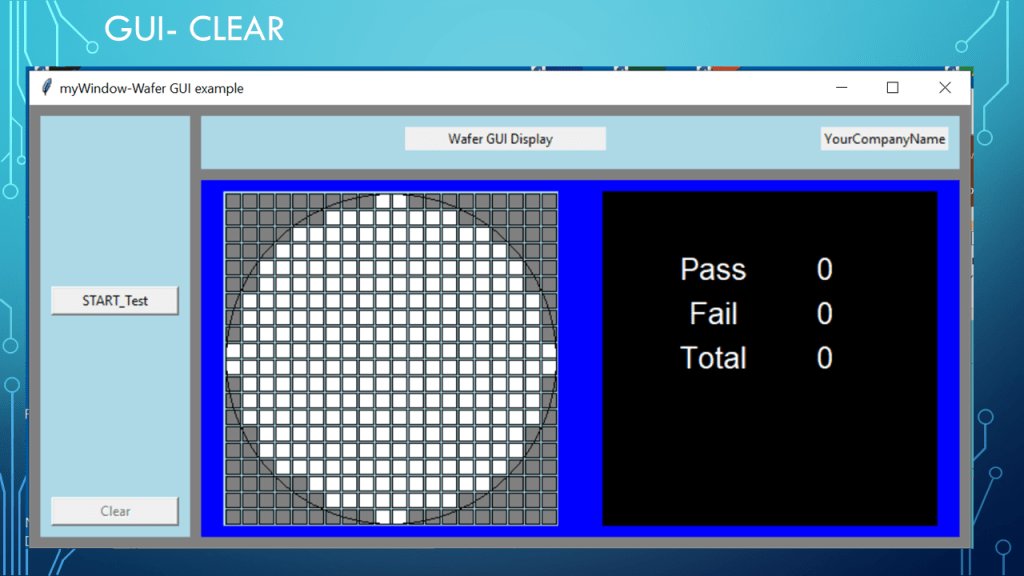
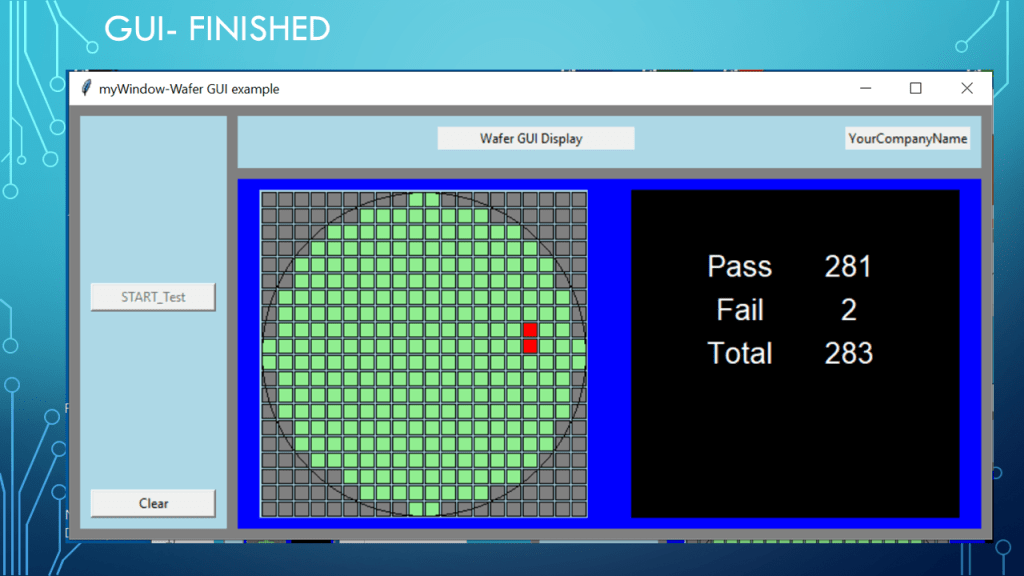
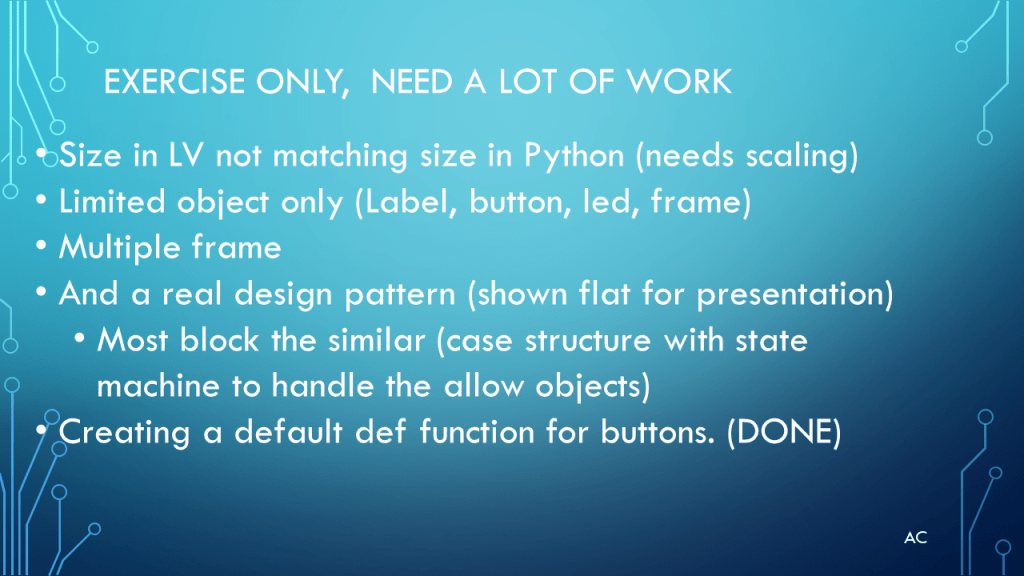
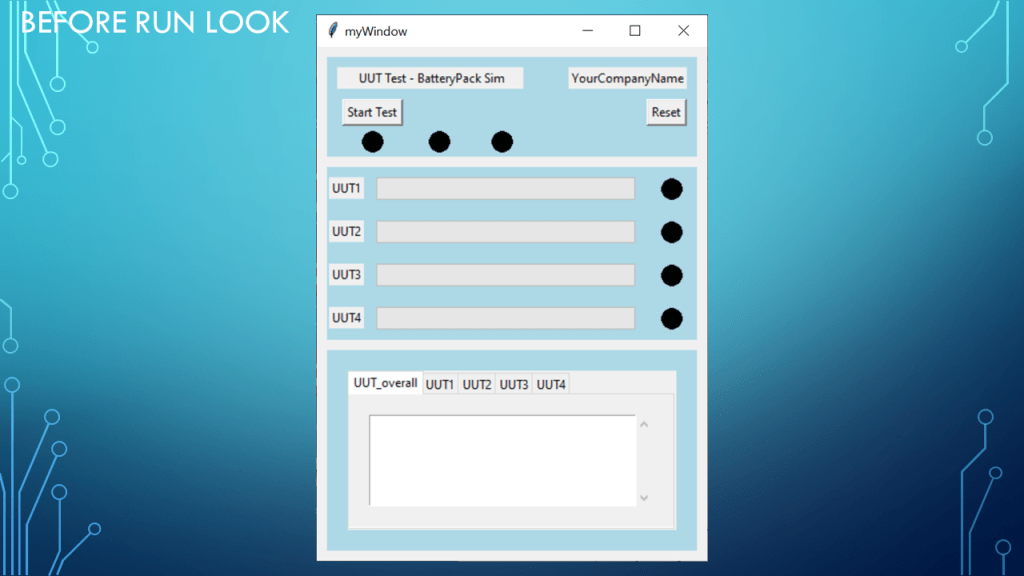
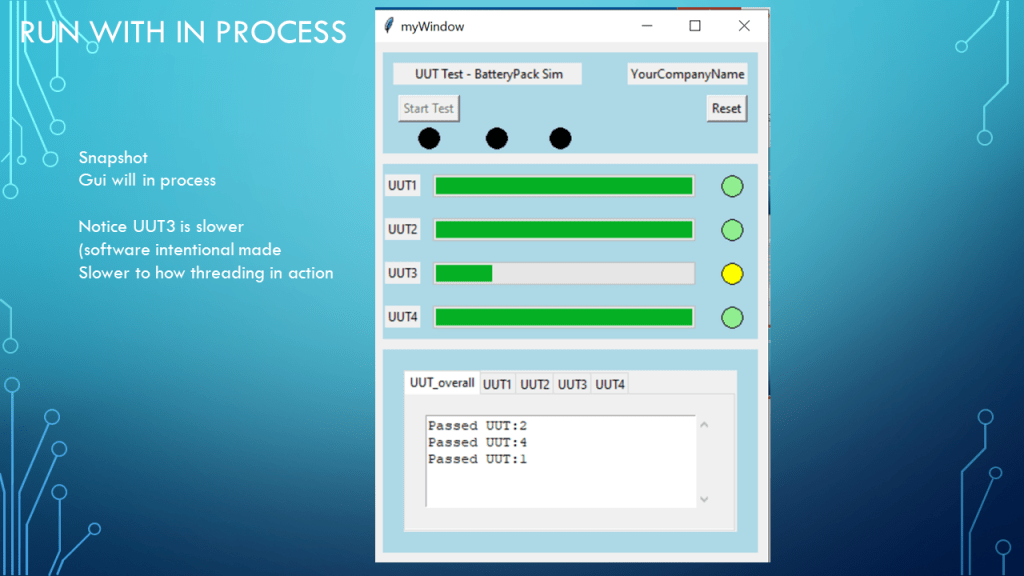
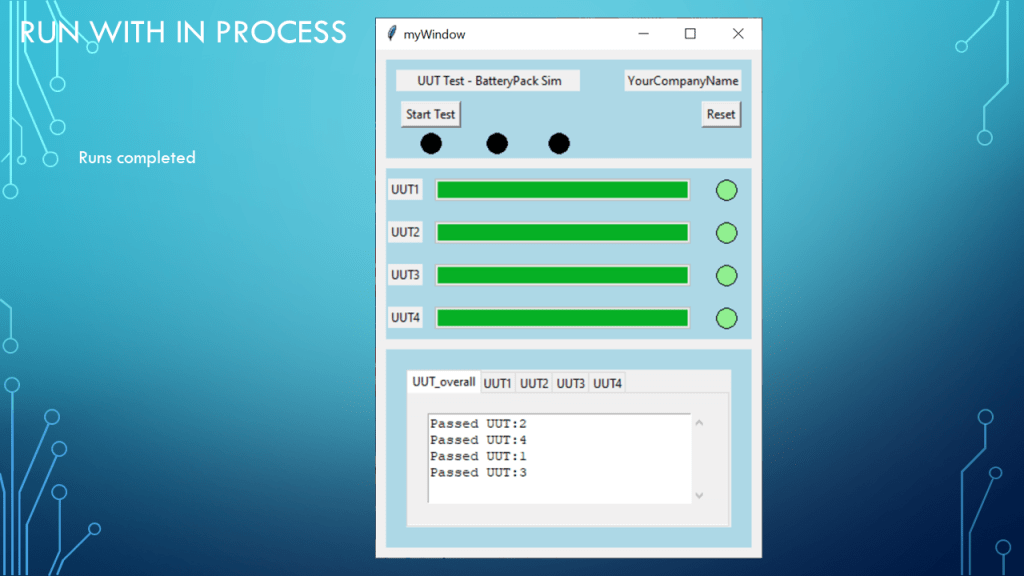
Updated a previous Wafer Display GUI
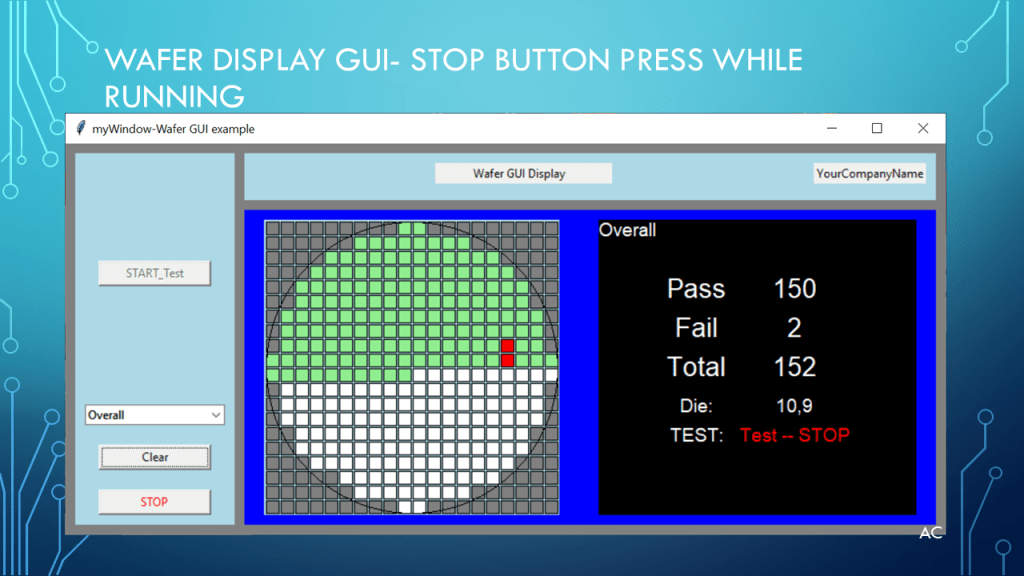
Able to show what type failure occurred for different test by changing color of die. Also a Stop Testing button


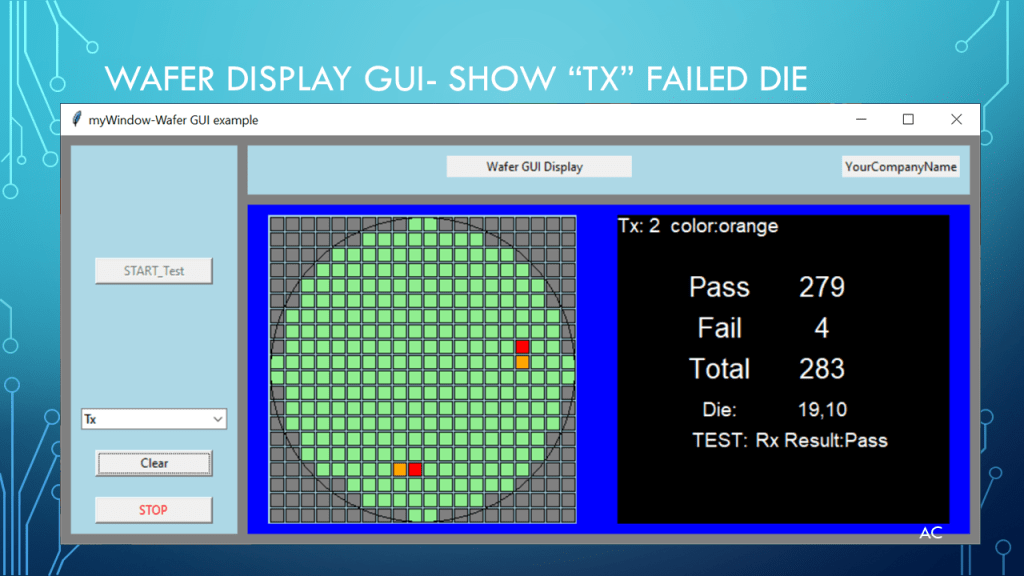


Video of combobox test type to show failed die, also show other die in overall failure so user does not think it has less total failures
Code Text
# -*- coding: utf-8 -*-
"""
Created on Mon Apr 3 10:21:48 2023
@author: aleja
"""
from tkinter import *
#for some reason from tkinter.ttk import * cause bg lightblue error
from tkinter.ttk import Combobox
#import math
import time
#import os #for path filename join
#import threading
Stop_Flag=0
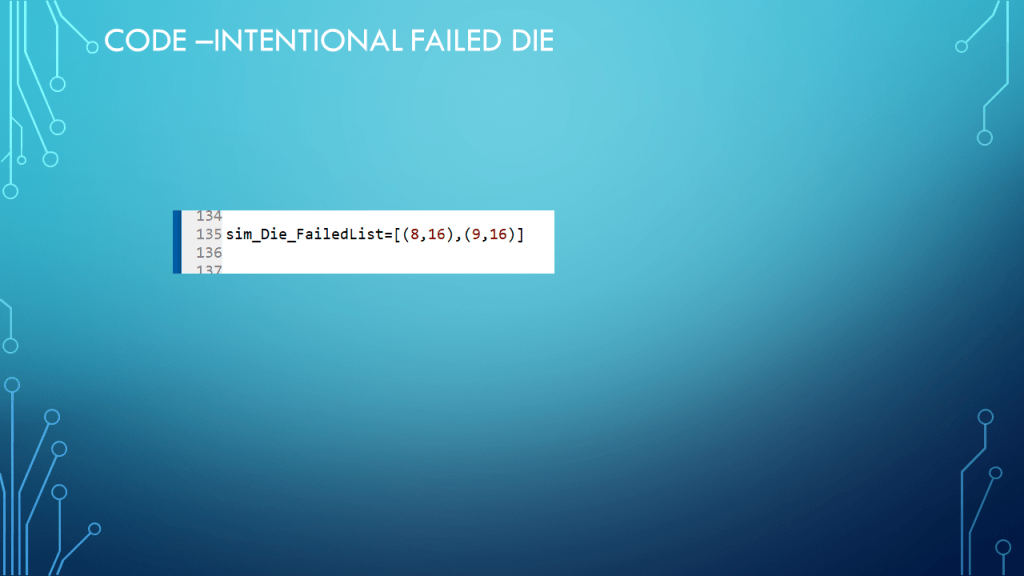
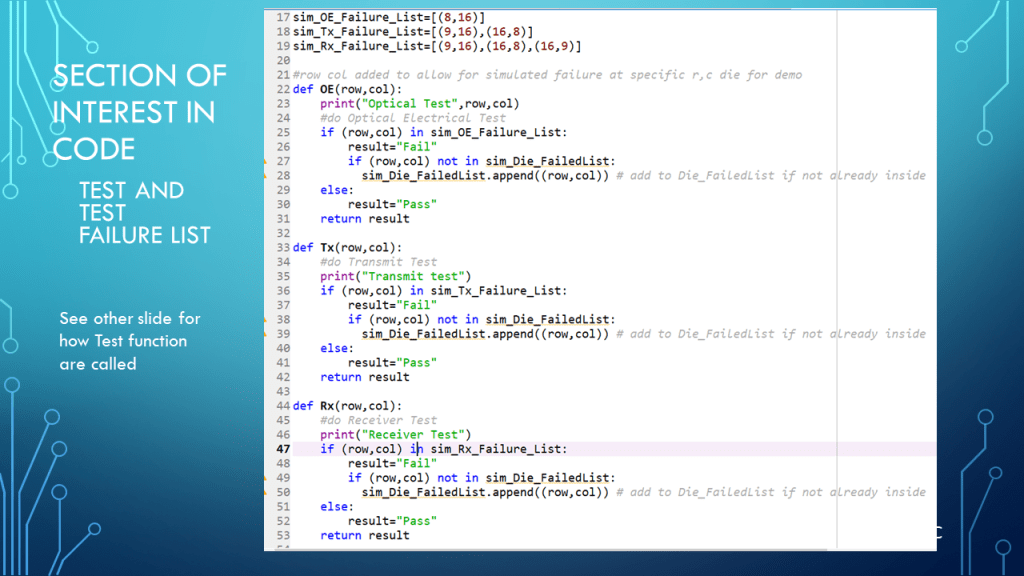
sim_OE_Failure_List=[(8,16)]
sim_Tx_Failure_List=[(9,16),(16,8)]
sim_Rx_Failure_List=[(9,16),(16,8),(16,9)]
#row col added to allow for simulated failure at specific r,c die for demo
def OE(row,col):
print("Optical Test",row,col)
#do Optical Electrical Test
if (row,col) in sim_OE_Failure_List:
result="Fail"
if (row,col) not in sim_Die_FailedList:
sim_Die_FailedList.append((row,col)) # add to Die_FailedList if not already inside
else:
result="Pass"
return result
def Tx(row,col):
#do Transmit Test
print("Transmit test")
if (row,col) in sim_Tx_Failure_List:
result="Fail"
if (row,col) not in sim_Die_FailedList:
sim_Die_FailedList.append((row,col)) # add to Die_FailedList if not already inside
else:
result="Pass"
return result
def Rx(row,col):
#do Receiver Test
print("Receiver Test")
if (row,col) in sim_Rx_Failure_List:
result="Fail"
if (row,col) not in sim_Die_FailedList:
sim_Die_FailedList.append((row,col)) # add to Die_FailedList if not already inside
else:
result="Pass"
return result
#must be below function definition
Tests_seq=[OE,Tx,Rx] #no string becasuse this will be functionName
Test_Result=["Pass","Fail","Error"] #not used
#GUI setup below
myWindow=Tk()
myWindow.title("myWindow-Wafer GUI example")
myWindow.minsize(900,400)
myWindow.maxsize(900,400) #if you want to move the operator table to see rest of belt comment out
# do this or frame (last frame row number, in window will not follow window (expanding)
myWindow.grid_rowconfigure(0,weight=1) #Important This was the reason for on frame being stuck at bottom was row 0 but 3frames
myWindow.grid_columnconfigure(1,weight=1)
myWindow.configure(background='gray')
#two Frames
#left and right
#frame1 Left
# adjust r,c,sticky, row and column config as need
frame1=Frame(myWindow,width=120,height=300,bg='lightblue')
frame1.grid(row=0, column=0, sticky='NSWE', padx=10, pady=10, columnspan=1,rowspan=2)
frame1.rowconfigure(0,weight=1)
frame1.columnconfigure(0,weight=0) #the lastcol goes along with rigth side expanding
#frame2 Right
# adjust r,c,sticky, row and column config as need
frame2=Frame(myWindow,width=300,height=300,bg='blue')
frame2.grid(row=1, column=1, sticky='NESW', padx=(0,10), pady=(0,10), columnspan=1) #padding ALSO takes two arguments tuple
frame2.rowconfigure(0,weight=1)
frame2.columnconfigure(1,weight=1) #the lastcol goes along with rigth side expanding
Die_Column=20
Die_Row=20
#Dies
Die_w=15 #light top right Y
Die_h=15
Die_x=0
Die_y=0
Die_xpad=2
Die_ypad=2
#Led Indictor
Wafer_Width=Die_Column*Die_w+Die_xpad
Wafer_Height=Die_Row*Die_h+Die_ypad
canv2=Canvas(frame2,width=Wafer_Width, height=Wafer_Height, bg='lightblue', bd=0, highlightthickness=0)
canv2.grid(row=0, column=0, columnspan=1,padx=20,pady=10)
canv3=Canvas(frame2,width=Wafer_Width+30, height=Wafer_Height, bg='black', bd=0, highlightthickness=0)
canv3.grid(row=0, column=1, columnspan=1,padx=20,pady=10)
fbinx1=100
fbiny1=50
Result_pady=20
Pass_Bin_Label=canv3.create_text(fbinx1,fbiny1+20,fill="white",text="Pass",font=('Arial',20,''))
Pass_Bin_count=canv3.create_text(fbinx1+100,fbiny1+20,fill="white",text="0",font=('Arial',20,''))
Fail_Bin_Label=canv3.create_text(fbinx1,fbiny1+60,fill="white",text="Fail",font=('Arial',20,''))
Fail_Bin_count=canv3.create_text(fbinx1+100,fbiny1+60,fill="white",text="0",font=('Arial',20,''))
Total_Bin_Label=canv3.create_text(fbinx1,fbiny1+100,fill="white",text="Total",font=('Arial',20,''))
Total_Bin_count=canv3.create_text(fbinx1+100,fbiny1+100,fill="white",text="0",font=('Arial',20,''))
Die_Label=canv3.create_text(fbinx1,fbiny1+140,fill="white",justify="left",text="Die:",font=('Arial',14,''))
Die_RC_Label=canv3.create_text(fbinx1+100,fbiny1+140,fill="white",justify="left",text=" ",font=('Arial',14,''))
Test_Label=canv3.create_text(fbinx1,fbiny1+170,fill="white",justify="left",text="TEST:",font=('Arial',14,''))
Test_Name_Label=canv3.create_text(fbinx1+100,fbiny1+170,fill="white",anchor='center',justify="left",text=" ",font=('Arial',14,''))
frame3=Frame(myWindow,width=100,height=100,bg='lightblue')
frame3.grid(row=0, column=1, sticky='NESW', padx=(0,10), pady=10, columnspan=1) #padding ALSO takes two arguments tuple
frame3.rowconfigure(1,weight=0)
frame3.columnconfigure(1,weight=1) #the lastcol goes along with rigth side expanding
AppTitleLabel=Label(frame3, text=" Wafer GUI Display ")
CompanyName=Label(frame3, text="YourCompanyName")
AppTitleLabel.grid(row=0, column=0, padx=0, pady=10, columnspan=2) #span 2 so it does not affect component button
CompanyName.grid(row=0, column=3, padx=10, sticky='E') #Keep
Die_Info_List=[]
Die_Canv_List=[]
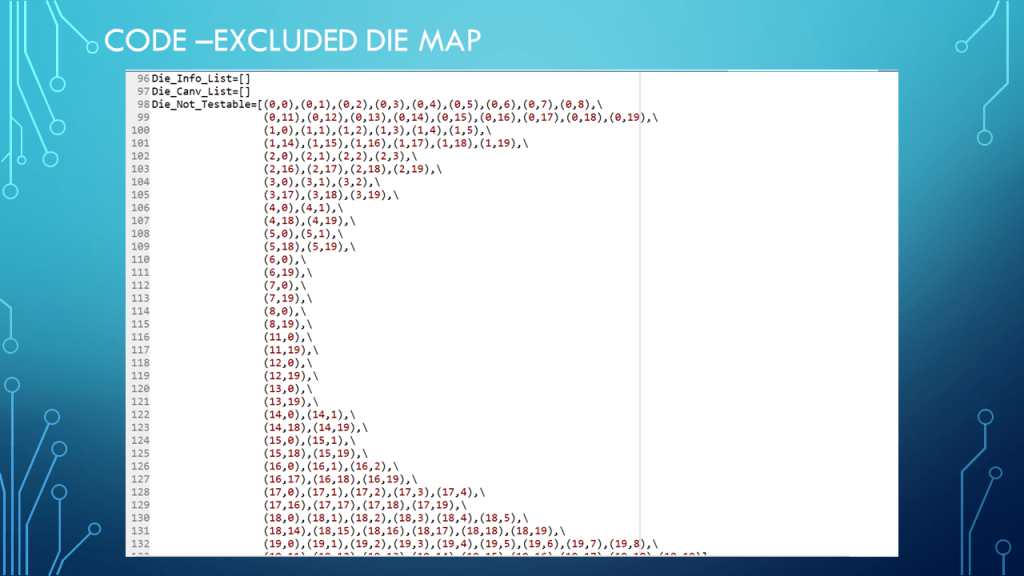
Die_Not_Testable=[(0,0),(0,1),(0,2),(0,3),(0,4),(0,5),(0,6),(0,7),(0,8),\
(0,11),(0,12),(0,13),(0,14),(0,15),(0,16),(0,17),(0,18),(0,19),\
(1,0),(1,1),(1,2),(1,3),(1,4),(1,5),\
(1,14),(1,15),(1,16),(1,17),(1,18),(1,19),\
(2,0),(2,1),(2,2),(2,3),\
(2,16),(2,17),(2,18),(2,19),\
(3,0),(3,1),(3,2),\
(3,17),(3,18),(3,19),\
(4,0),(4,1),\
(4,18),(4,19),\
(5,0),(5,1),\
(5,18),(5,19),\
(6,0),\
(6,19),\
(7,0),\
(7,19),\
(8,0),\
(8,19),\
(11,0),\
(11,19),\
(12,0),\
(12,19),\
(13,0),\
(13,19),\
(14,0),(14,1),\
(14,18),(14,19),\
(15,0),(15,1),\
(15,18),(15,19),\
(16,0),(16,1),(16,2),\
(16,17),(16,18),(16,19),\
(17,0),(17,1),(17,2),(17,3),(17,4),\
(17,16),(17,17),(17,18),(17,19),\
(18,0),(18,1),(18,2),(18,3),(18,4),(18,5),\
(18,14),(18,15),(18,16),(18,17),(18,18),(18,19),\
(19,0),(19,1),(19,2),(19,3),(19,4),(19,5),(19,6),(19,7),(19,8),\
(19,11),(19,12),(19,13),(19,14),(19,15),(19,16),(19,17),(19,18),(19,19)]
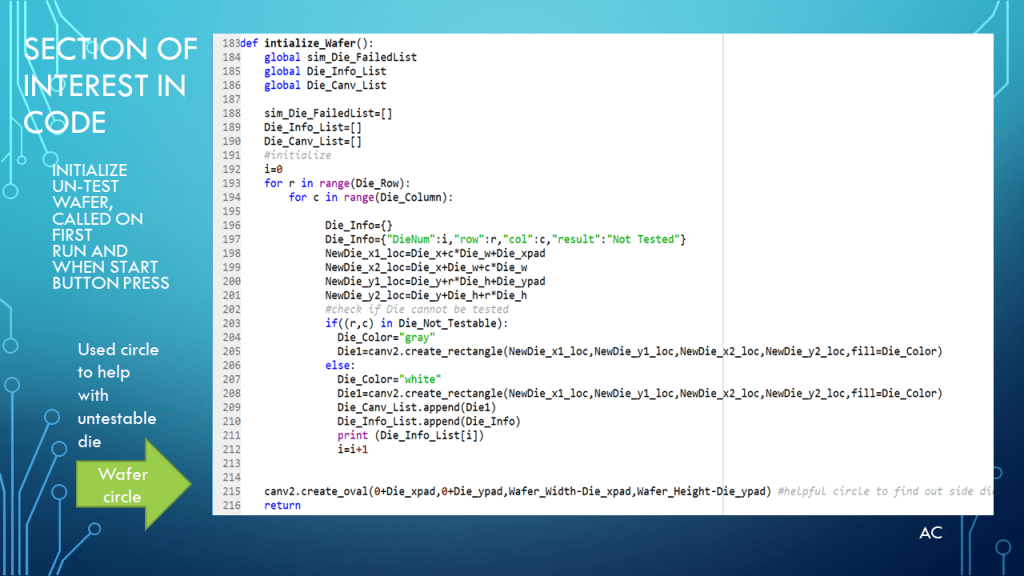
def intialize_Wafer():
global sim_Die_FailedList
global Die_Info_List
global Die_Canv_List
sim_Die_FailedList=[]
Die_Info_List=[]
Die_Canv_List=[]
#initialize
i=0
for r in range(Die_Row):
for c in range(Die_Column):
Die_Info={}
Die_Info={"DieNum":i,"row":r,"col":c,"result":"Not Tested"}
NewDie_x1_loc=Die_x+c*Die_w+Die_xpad
NewDie_x2_loc=Die_x+Die_w+c*Die_w
NewDie_y1_loc=Die_y+r*Die_h+Die_ypad
NewDie_y2_loc=Die_y+Die_h+r*Die_h
#check if Die cannot be tested
if((r,c) in Die_Not_Testable):
Die_Color="gray"
Die1=canv2.create_rectangle(NewDie_x1_loc,NewDie_y1_loc,NewDie_x2_loc,NewDie_y2_loc,fill=Die_Color)
else:
Die_Color="white"
Die1=canv2.create_rectangle(NewDie_x1_loc,NewDie_y1_loc,NewDie_x2_loc,NewDie_y2_loc,fill=Die_Color)
Die_Canv_List.append(Die1)
Die_Info_List.append(Die_Info)
print (Die_Info_List[i])
i=i+1
canv2.create_oval(0+Die_xpad,0+Die_ypad,Wafer_Width-Die_xpad,Wafer_Height-Die_ypad) #helpful circle to find out side dies
return
#==================Testing function
def Start_Wafer_Testing():
intialize_Wafer()
Pass_cnt=0
Fail_cnt=0
Total_cnt=0
START_Testing['state']="disabled"
Clear_Wafer['state']="disabled"
for Die in Die_Info_List:
if (Stop_Flag==1):
canv3.itemconfigure(Test_Name_Label,text=("Test -- STOP"),fill='red')
break
else:
#print( Die['DieNum'])
#test control of on die
#Move wafer prober to die
#Move_Prober_to_Die(Die['row'],Die['col']) a possible function to move prober to Die Position (not focus of this demo)
Test_Results=[]
Test_Names=[]
for Test in Tests_seq:
Test_result=Test(Die['row'],Die['col']) #Test Function with its Arguments
Test_Name=Test.__name__
print(Test_Name +" TestResult: " + Test_result)
Test_Results.append(Test_result)
Test_Names.append(Test_Name)
time.sleep(0.05) #slow it down to see test name
canv3.itemconfigure(Die_RC_Label,text=(str(Die['row'])+","+str(Die['col'])))
canv3.itemconfigure(Test_Name_Label,text=(Test_Name +" Result:" + Test_result))
myWindow.update()
if((Die['row'],Die['col']) in sim_Die_FailedList):
canv2.itemconfigure(Die_Canv_List[Die['DieNum']],fill='red')
Die['result']="***Failed***"
Fail_cnt=Fail_cnt+1
canv3.itemconfigure(Fail_Bin_count,text=str(Fail_cnt))
else:
canv2.itemconfigure(Die_Canv_List[Die['DieNum']],fill='lightgreen')
Die['result']="Passed"
time.sleep(0.01)
myWindow.update()
Pass_cnt=Pass_cnt+1
canv3.itemconfigure(Pass_Bin_count,text=str(Pass_cnt))
print("DieInfo",Die)
Total_cnt=Pass_cnt+Fail_cnt
canv3.itemconfigure(Total_Bin_count,text=str(Total_cnt))
Clear_Wafer['state']="normal"
print ("Failed Dies:",sim_Die_FailedList) #show failed dies
def Clear_Wafer_Result():
global Stop_Flag
Stop_Flag=0
START_Testing['state']="disabled"
Clear_Wafer['state']="disabled"
canv3.itemconfigure(Pass_Bin_count,text=str(0))
canv3.itemconfigure(Fail_Bin_count,text=str(0))
canv3.itemconfigure(Total_Bin_count,text=str(0))
canv3.itemconfigure(Test_Name_Label,text="",fill='white')
canv3.itemconfigure(Die_RC_Label,text="")
Show_Result.current(0)
canv3.itemconfigure(Result_Type_Label,text=myStrVar.get())
for Die in Die_Info_List:
print( Die['DieNum'])
#test control of on die
canv2.itemconfigure(Die_Canv_List[Die['DieNum']],fill='white')
myWindow.update()
START_Testing['state']="normal"
print(Show_Result.get())
def Stop_Wafer_Testing():
global Stop_Flag
Stop_Flag=1
START_Testing['state']="disabled"
Clear_Wafer['state']="normal"
return
def Combobox_Value_Changed(event):
global myStrVar
canv3.itemconfigure(Result_Type_Label,text=myStrVar.get())
Clear_Wafer.focus()
Show_Map_for(myStrVar.get()) #show wafer this this type failure
return
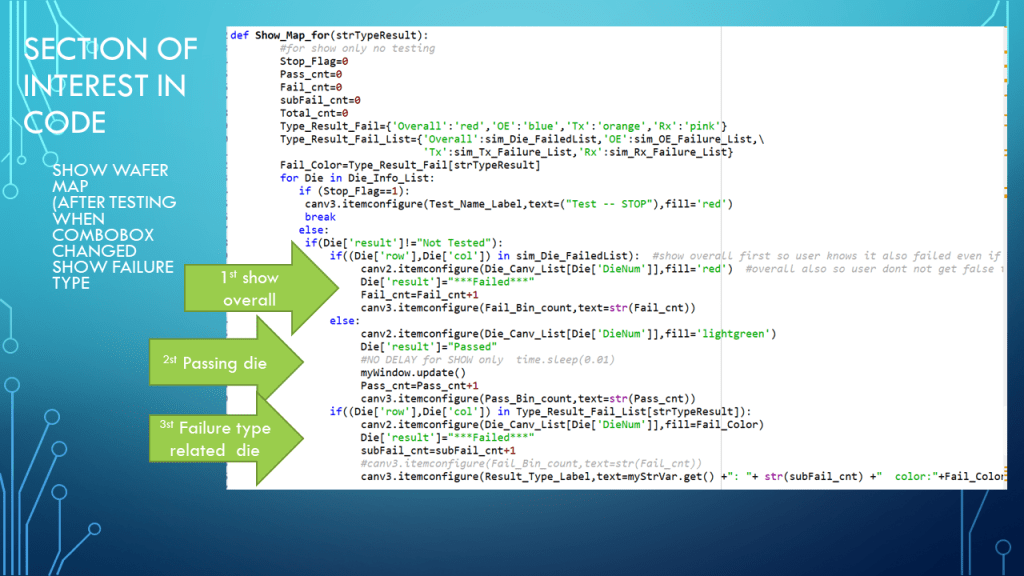
def Show_Map_for(strTypeResult):
#for show only no testing
Stop_Flag=0
Pass_cnt=0
Fail_cnt=0
subFail_cnt=0
Total_cnt=0
Type_Result_Fail={'Overall':'red','OE':'blue','Tx':'orange','Rx':'pink'}
Type_Result_Fail_List={'Overall':sim_Die_FailedList,'OE':sim_OE_Failure_List,\
'Tx':sim_Tx_Failure_List,'Rx':sim_Rx_Failure_List}
Fail_Color=Type_Result_Fail[strTypeResult]
for Die in Die_Info_List:
if (Stop_Flag==1):
canv3.itemconfigure(Test_Name_Label,text=("Test -- STOP"),fill='red')
break
else:
if(Die['result']!="Not Tested"):
if((Die['row'],Die['col']) in sim_Die_FailedList): #show overall first so user knows it also failed even if not of type selected
canv2.itemconfigure(Die_Canv_List[Die['DieNum']],fill='red') #overall also so user dont not get false thinking
Die['result']="***Failed***"
Fail_cnt=Fail_cnt+1
canv3.itemconfigure(Fail_Bin_count,text=str(Fail_cnt))
else:
canv2.itemconfigure(Die_Canv_List[Die['DieNum']],fill='lightgreen')
Die['result']="Passed"
#NO DELAY for SHOW only time.sleep(0.01)
myWindow.update()
Pass_cnt=Pass_cnt+1
canv3.itemconfigure(Pass_Bin_count,text=str(Pass_cnt))
if((Die['row'],Die['col']) in Type_Result_Fail_List[strTypeResult]):
canv2.itemconfigure(Die_Canv_List[Die['DieNum']],fill=Fail_Color)
Die['result']="***Failed***"
subFail_cnt=subFail_cnt+1
#canv3.itemconfigure(Fail_Bin_count,text=str(Fail_cnt))
canv3.itemconfigure(Result_Type_Label,text=myStrVar.get() +": "+ str(subFail_cnt) +" color:"+Fail_Color)
print("DieInfo",Die)
Total_cnt=Pass_cnt+Fail_cnt
canv3.itemconfigure(Total_Bin_count,text=str(Total_cnt))
Clear_Wafer['state']="normal"
START_Testing=Button(frame1, text='START_Test',width=15, command=lambda:Start_Wafer_Testing())
START_Testing.grid(row=0, column=0,padx=10,pady=10)
Clear_Wafer=Button(frame1, text='Clear',width=15, command=lambda:Clear_Wafer_Result())
Clear_Wafer.grid(row=2, column=0,padx=10,pady=10)
Stop_Wafer=Button(frame1, fg='red',text='STOP',width=15, command=lambda:Stop_Wafer_Testing())
Stop_Wafer.grid(row=3, column=0,padx=10,pady=10)
#move to row1
myStrVar=StringVar("") #note StringVar is a tkinter variable ,tell tkinter this variable is own by tkinter
Show_Result=Combobox(frame1,textvariable=myStrVar,values=["Overall","OE","Tx","Rx"])
Show_Result.grid(row=1, column=0,padx=10,pady=10)
Show_Result.current(0) #load the Overall as default
Show_Result.bind("<<ComboboxSelected>>",Combobox_Value_Changed) # a different way to connect function to event
Result_Type_Label=canv3.create_text(0,10,fill="white",anchor="w",text=myStrVar,font=('Arial',14,''))
canv3.itemconfigure(Result_Type_Label,text=myStrVar.get()) #this is thread save way not myStrVar not myString.get without ()
START_Testing['state']="normal"
Clear_Wafer['state']="disabled"
intialize_Wafer()
#last Line
myWindow.mainloop()
Download for code below
Notes
- Presentation: Updated Wafer Display GUI with Pass Fail and Total Die tested to handle Testing functions place holder and showing different test type failures, also a stop. Also a Stop Testing button was added, and ComboBox with binding.
- Programming Language used: Python 3.7 in Spyder
- Presentation app: Microsoft’s PowerPoint
- Python and Tkinter are products of respective company
- Presentation shown to spark ideas of use.
- This presentation is not connected to or endorsed by any company.
- Use at your own risk.
- Tags: Python, Python3.7, Tkinter , Canvas ,GUI, List, Dictionary, Tuple for (row,col), Combobox, StringVar,Calling function from List